Threads are an excellent source for children's and adult creativity. Using this material of different thicknesses and textures, you can create interior decorative elements, jewelry, original toys and many different crafts. Both the oldest and the youngest handmade lovers can work with threads.
Octopus toy

You will need thick yarn. From it you must first form the body of an octopus. Wrap the yarn around your fingers, tie it, forming a ball, give it a spherical shape.
For the octopus legs, cut 24 threads about 50 centimeters long, arrange them in threes, fold them in half and place them on top of the ball you have made, grabbing them at the bottom so that the ends hang down. Braid these ends into braids, you should get 8 braid legs.

You can glue store-bought eyes to the toy, but you can also make eyes from black and white paper.
Panel in the shape of a heart

This panel is suitable both as a gift and for room decoration.
Draw a heart on a sheet of paper, cut it out, and attach the panel to the base (it can be thick canvas or treated chipboard canvas). Draw the outline of the heart with a pencil. Mark this outline with small nails, and then weave a red thread between the nails in a random order.
Little chicken

The size of the chicken will depend on the auxiliary material: two circles of paper. Cut out two circles with round holes inside. Wind thick yellow yarn around them and carefully cut it around the perimeter of the circle, and then tie it with thread between the two circles. This is how a pompom is made. This is the basis of the chicken.
Straighten the ball, glue on its eyes, mouth and legs.
Friendship Bracelet

You can create a bauble using a regular cardboard circle. You need to make a very simple device, like a mini “loom”. From thick cardboard, cut out a circle with a diameter of 8-12 cm, divide it into 8 sectors, and draw it. Make a hole in the center and pull threads through it (7 colors are needed, the length of the thread should be at least 25-30 cm). Repeat the weaving pattern shown in the photo: throw the thread over the thread, going in a circle.


You can use both the thinnest threads, for example, floss, and thick woolen threads in weaving; in the latter case, the bauble will be more voluminous, and the color transitions will be more noticeable.
Ball for decoration


Making a ball is quite simple, having only a sufficient number of bright threads on hand - it is better if it is wool yarn, a balloon, a container for glue and good glue (PVA is suitable).
There are two ways to apply glue to the thread. The first is to immediately soak the cut thread in glue and apply it to the ball, but in this case the application will be sloppy, the second method is better: pull the thread into a gypsy needle, pierce the PVA jar with the needle and pull the needle and thread through the jar. This way the thread will pass through the glue and you can adjust its quantity and application.
When the glue dries, all that remains is to deflate the balloon and pull it out of the thread ball.
Yarn can be wrapped, yarn can be glued to create shaped elements, yarn gives a special texture and any color to each surface you choose. Yarn is a completely unique and versatile material for needlework, and we’re not talking about knitting here!
1. We collect the remains of yarn of approximately the same thickness (slight variations are possible), but of different textures and different colors and shades. We take the cheapest photo frame - from any material. With glue, we simply wrap the yarn more or less evenly around the edges of the frame, alternating colors. The frame under the yarn should not be visible. In several places we add 4-10 different small beads, stringing them onto the yarn (one at a time or in small series) and then securing them to the frame with drops of glue.

As you can see in the picture, frames wrapped in white look just as good, if not better.
You can put anything in the frame from a mirror to a quote, a photo or a snapshot of your family and friends.
2. The situation is similar with lamp shades/shades. You just need a lot more yarn, and the base of the lampshade should be used not randomly, but in coils tightly fitted to each other, periodically adding a drop of glue.

If you already have a lampshade - good, if not, then the top of the lampshade is, in fact, just a frame made of strong wire (two circles - the bottom one is larger, the top one is slightly smaller, and 4 vertical connections between the circles) and glued on top (or sewn ) thin, stiff fabric or sheet of plastic. Therefore, you can always assemble the lampshade with your own hands.
3. Using the same principle, bracelets are decorated with yarn - in ombre or gradient style, napkin rings and other shapes are formed.


Combine two or more types of yarn - of different thicknesses and textures - and get absolutely amazing things.


4. Make pompoms of different sizes from yarn - like, see in the pictures below - and from pompons a variety of elements from rugs, cards and toys to flowers, crib mobiles, Christmas tree garlands and curtains.


5. Thread balls (and other shapes) are created from thin yarn. How - see.

6. In the middle, also using drops of hot glue, you can wrap yarn around a box, jar and any other suitable container. Elementary and very effective.


7. Wire contours wrapped in yarn. Cover the wire with a strip of crepe paper and wait until the glue dries. We bend the glued wire into the desired contour. We tie the tip of a skein of yarn to the outline in the optimal place and begin to wrap the wire outline with yarn in arbitrary directions. At the same time, each time touching the contour, we wrap the yarn around the wire twice.


A branch from this direction, in a slightly different style:

8. You can draw with yarn. How - see more details.


9. Naturalistic feathers can be made from fine yarn. We wrap the wire with yarn, securing it with drops of glue. We cut pieces of yarn of equal lengths of different colors (in the range of feathers), tie them (in the middle of the length) in a row, one after the other, closely on the glued wire. We dip the future feather in a glue solution (or a solution with starch), place it on polyethylene on a horizontal surface, align the ends of the yarn, placing them strictly parallel and pointing them slightly at an upward angle. Wait for it to dry, cut it to the shape of a feather.


11. Wall panels are created from yarn. To do this, you simply need to tie long pieces of multi-colored yarn on a thin wooden stick. We cut the yarn at the bottom, giving the edge the desired shape.
If you have some yarn left over after knitting, I’m ready to tell you what DIY yarn crafts you can make from it. Almost all the works are simple, even a child can make them. To make others, the kids will need your help. I think such children's crafts will decorate the interior of your home, will be useful for toddlers for competitions and exhibitions, or will be excellent gifts for friends and family.
DIY yarn pompom
I decided to start with 3 ways to make pompoms. They will be useful to us more than once in our future work. You can choose the option that seems most convenient to you.
Method 1. How to make a pompom from yarn with your own hands with a cardboard base
The most common way. For it we will need:
- Thick paper (2 sheets). You can use cardboard as a base material
- Compass
- Scissors
How to do: 
- Draw 2 circles on paper. External - according to the size of future pom-poms. Internal - depends on how thick you want the balls to be (the narrower, the thicker), as well as on your desire (it is easier to work with a wide hole for children 5-7 years old).
- Cut out circles. We make a hole in them.
- We cut one side of the base so that we can wrap it with thread without any problems.
- Next, we wind the wool.
- We move 2 circles apart.
- Cutting the wool.
- We thread the thread between the circles and tie the wool.
We remove the base. Trim off the uneven edges.
Method 2. On the fork.
Plus, you don’t need to make a base. But the size of the balls will be small.

- We wind the thread around the four tines of the fork.
- Between the 2nd and 3rd teeth we thread a thread with which we tie the yarn.
- Remove from the fork.
- Cut the resulting loops of wool.
All that remains is to trim the edges.
How to make pompoms from yarn quickly
This is the easiest option pompom without cardboard base . Another plus is that you get a lot of blanks at once from which pom-poms are made. The downside is that it’s difficult (but possible) to make very curvy ones.

That's all! Let's fluff up our “balls”.
DIY crafts from yarn and threads
I'll start with pom-poms, or rather I'll continue. How can they be applied? First of all, you can use it for decoration for the holidays:, New Year,.
These can be garlands of pompoms. By the way, remember? If you haven't seen it, check out the link. It turns out very festive and bright.
And today I found some more interesting ideas:

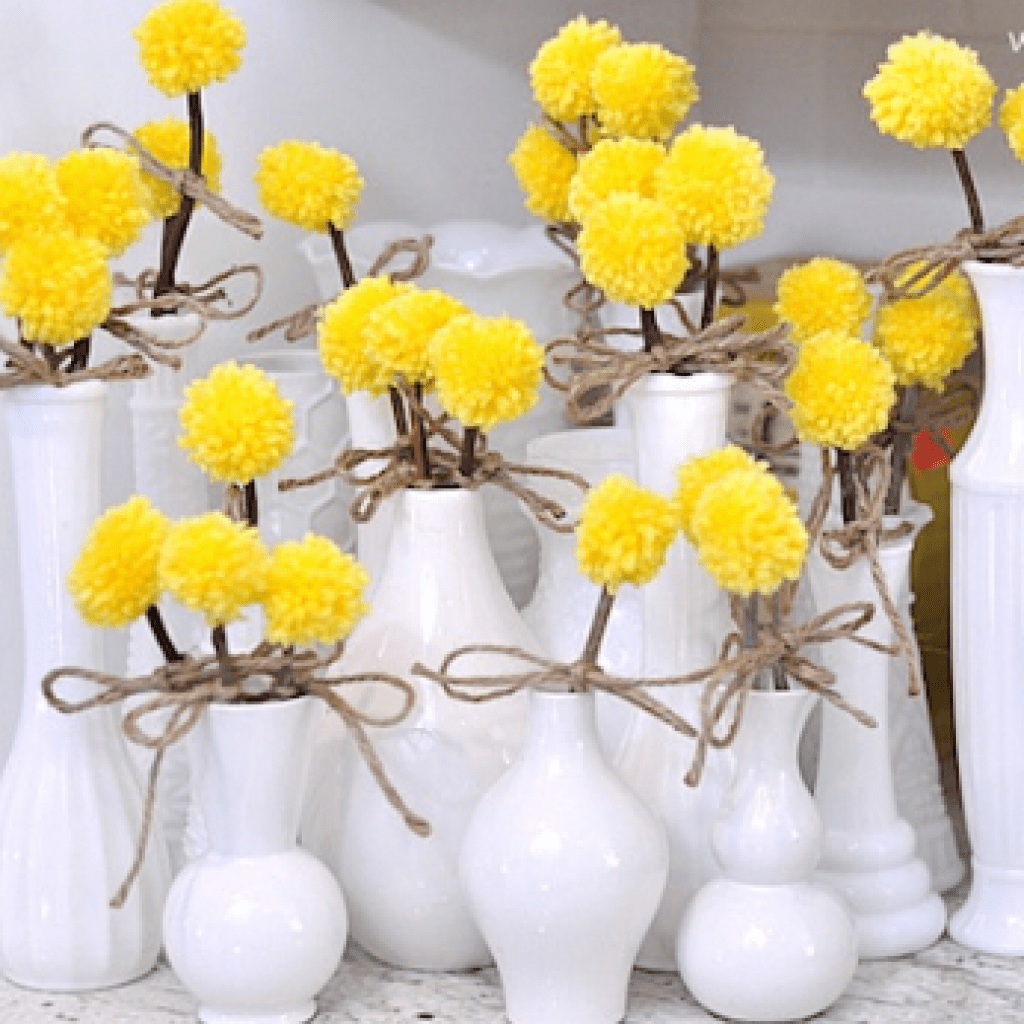
Here are the letters, wreaths, dandelions and pom-pom trees.


Rug made of pompoms

How do you like these fluffies? You won't find these on sale! And you can make any shape. Twist pom-poms to match your favorite TV series. Just really? You can use that quick method of forming pompoms, when you wrap them around a chair and get a lot of them at once (I wrote above).
To make a pompom rug with your own hands, you will need a mesh. It could be a rubberized mesh or mesh fabric, or maybe a construction material. I once did it not on a mesh, but on a towel, I simply glued the pompoms with hot glue. It was great too. The rug served for a long time until we moved).
And with a grid it’s much easier. See for yourself.

Here, in my opinion, is the construction grid.

Crafts from yarn and threads for children
Piggy magnet
When I saw this photo, I really liked the idea for its simplicity. True, it is assumed that this work is made of cord. But you can use thick yarn or, if you are making from leftovers thin wool, weave it into a braid/chain.

- Twist the chain into a spiral and glue it to the cardboard.
- Cut out ears and a nickel from felt. Glue them on the piggy’s “head”.
- Sew button eyes and beads onto the nickel.
- Attach the cardboard to the magnet.
But this is not the last piggy. I have another model.
Fluffy pig
And again you will need a pompom.

- Glue a nickel button to it.
- Eyes.
- Felt ears.
A bow will look beautiful. If it’s difficult for kids, you don’t have to do the paws. But for children 10-14 years old I can do such a task. We cut them out of felt and glue them.
Bunny - rabbit
This is the case when the work looks very cool, but it seems so difficult to do. But it's actually simple.
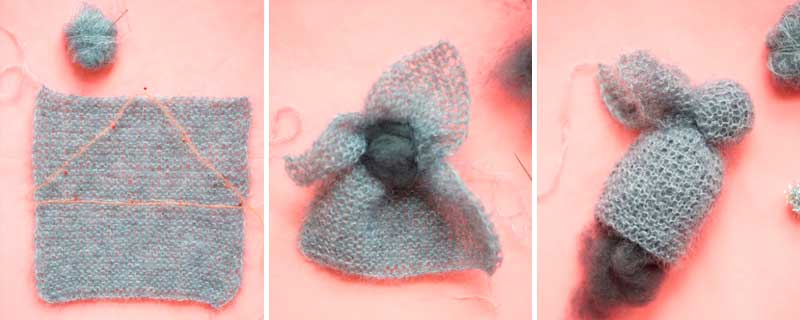
The size of the bunny will depend on the size of the square.
Photos
Horse

Now it is already clear that this is the muzzle of a horse. Glue on the eyes. Ready!
Another version of the horse. You will need two piles of thread, tie it as in the picture.

All that remains is to make the tail and mane. You can also use a felt saddle.

Thread necklace
Dove and bullfinches made of threads
I will have several options: dove and bullfinch . Using their example, I will show how you can create other birds using different coat colors.
You can also make sparrows and chickens by just changing the colors of the threads.
Detailed MK in our video.
And here are the bullfinches in the nest. The nest is also made of threads.
It is done according to the same scheme. We just need yarn of other colors:
- Black (back - wound along the length of the base);
- Gray (wings - wound along the width);
- Red (tummy - we wrap along the width of the base).
The thickness of all blanks is the same.
Titmouse master class
We will be mixing different strands of yarn! This is how we will decorate the birds.
We will need:


We make preparations: 
- We wrap burgundy wool on the wide side of the warp. Let's cut it.
- Yellow - we wrap it on the second cardboard. We cut it too.
- We wind white and blue together. Cut and tie in the middle.

Assembling the model:
We place burgundy and yellow bunches perpendicularly. Burgundy is at the bottom, yellow should be on top).

We bend the burgundy ones over the yellow ones.

We tie the burgundy ones with thread right under the yellow bunch.
We bend the yellow ones at a right angle. We tie it with thread to match the color.

We place the workpiece so that there are blue threads at the bottom and our bundle at the top.

Inside the blue ones is a wad of paper.

We bend all the threads (we mask the paper between them). We tie it under the ball, leaving a tail.

Align the tail.

We form legs from wire.

We insert the paws into the tummy.
Sew on the eyes.
Glue the beak.

Angry Birds made from pompoms
Red will be first. We wrap pink yarn around 3 fingers.

Red on top.

We remove it from our fingers while pulling out the thread with which we tie the pompom.

We tie and cut the threads.

We cut the pompom so as to get an ovaloid.

We make eyebrows and a beak from felt, eyes from white beads, and draw pupils with a marker. And don’t forget to slightly pull out the three threads on the head - the tuft, just by gently pulling the threads in the pompom.

For blue birds we do the same thing, only we take blue threads. do not forget to cut the pompom into an oval shape.

We wrap gray, black on top, make a pompom and cut it into a ball. We make the eyebrows, beak and forelock from felt and glue them with hot glue. Bead eyes and pupils are drawn with a marker. The only peculiarity is the fluff around the eyes. To do this, we glue gray threads onto the bead with rays like a snowflake.

For the pig you will need light green yarn and felt. We make a round pompom, maybe a little oval. Glue the nose out of felt (oval), draw dots with a marker. For the eyes you will need large beads, if not, you can take any color and paint it white, put a marker on the pupil. We do the eyebrows. Use tweezers to pull out the strings for the ears. And you're done!

For Chuck you need white and yellow threads. We first round the pompom, then cut it into a cone. Glue the beak, eyes.

Doll
As for me, even a simplified version, without decorations and details, is interesting. But more details:

- We wrap wool onto the base.
- We remove and bandage. Cut off the edges of the thread
- 2 cm below the dressing area, wrap it with thread and bandage it. This is how we formed the head.
- Once again we wrap the wool around the base (only in a smaller size).
- We knit this workpiece on both sides. These are hands.
- We thread our arms through the body, under the head. We tie it right under them.
Here, as for me, the doll is ready.
But you can make her a “face” from thin felt. Sew hair on top. And, if you divide the lower part of the yarn in half and tie each half, you will get a “boy”.
doll
Such a doll can be not just a toy, but even decoration or a Christmas tree toy.
She's not all thread, just her hair. But I liked it so much that I couldn’t pass it up.
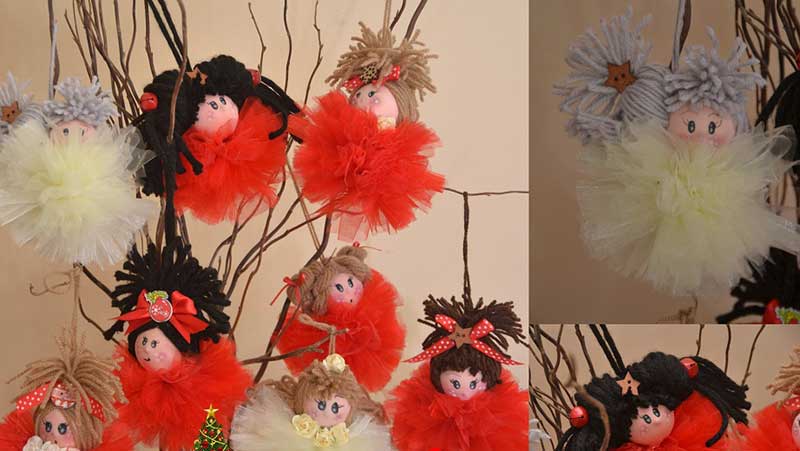
So, for the doll you will need tulle, which we wrap on 2 cardboard circles. Then we cut and tie. In general, we make a pompom from tulle.
Next, we cover the ball with beige knitwear, and using an eye shadow palette we draw cheeks, eyes, and eyebrows. We draw eyelashes with a marker. Next we do the hairstyle. We wind the yarn around our fingers, cut it and glue it onto the crown of the doll, so that the cut edge of the thread is a bang.
Take the second bundle of thread, tie it in the middle and glue it to the bottom of the head. We lift the hair up so that it completely covers the entire back of the head and collect it in a ponytail at the top of the head. We tie it with threads.

Glue the bow, decoration, and head to the body.

You can glue a thread - a loop - on the top of the head so that the doll can be hung if necessary.
Yarn jewelry
And look how easy it is to make tassel earrings.
dream Catcher
I posted on the blog how to make a giant dream catcher. It is incredibly beautiful and is a worthy decor for the most expensive designer interiors.

Snood scarf in 10 minutes
New very simple pattern from the beloved Alize Puffy. We knit a snood scarf from it without knitting needles or a hook, with our own hands, in just a couple of minutes.
Wonderful pattern and video from my favorite channel.
Knitted hat and also without knitting needles.
And a gorgeous blanket
Snowflake for the New Year

We can already make pom-poms. We'll need a fairly large ball to start with. 
We straighten the yarn.

First we divide into 2 halves, then in half. And then cut each part in half again. Then all 8 rays of the snowflake will be the same.

We bandage the rays, stepping back a little from the edge.
You can decorate a snowflake with beads, eyes, and embroidery.

Pillow
Do you love plush toys? I do! And I especially love to lie on them. You can make a fluffy pillowcase from leftover yarn. And it's easy to do. We wind 10-20 turns on our hand, depending on the thickness of the yarn. Remove from hand and bandage. Cut the threads. We get a skinny pompom. Now we comb it thoroughly and glue it to the base - a pillowcase using hot glue. Next, we’ll use a hair straightener and give our pillow a neat hairstyle. Ready!

Patterns, as you guessed, you can come up with yourself.
Dog made of threads
Do you love Yorkies? Or maybe your friend has such a dog.
Then you can give him such a magnet for the refrigerator.
Wreaths
We wrap yarn on a cardboard base and get an excellent basis for a wreath for any holiday. If you take yellow threads, you can make an Easter wreath.

Balls of thread
Here's how you can make a craft out of thread for Easter. We make a regular ball in the shape of an egg. We cut out the window and glue the decor.
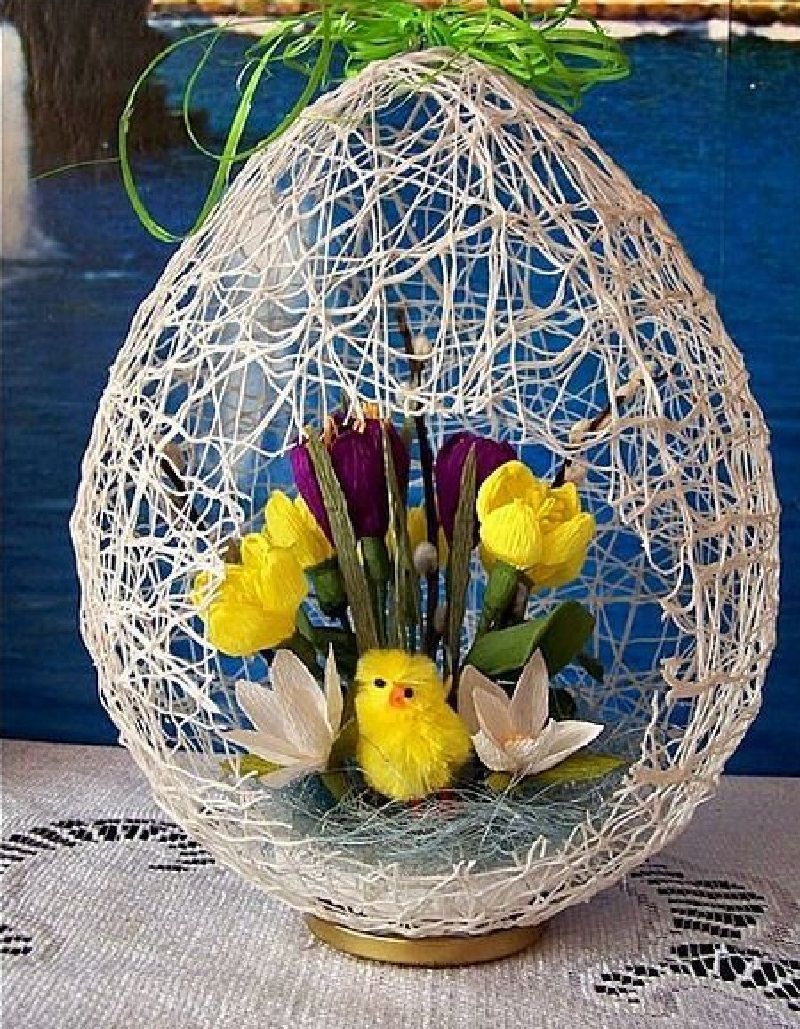
The second option is suitable if you have a foam base. We stick pins along the contour of the window, wrap the base with film and weave a web. As you guessed, it is not possible to remove it from such a mold if you make a full egg at once. Therefore, we make 2 halves and at the end we tie them around the perimeter.

Letters and numbers
Need birthday decor?

We make a base out of cardboard and decorate with threads, just wrap it around!

Here are other design options:


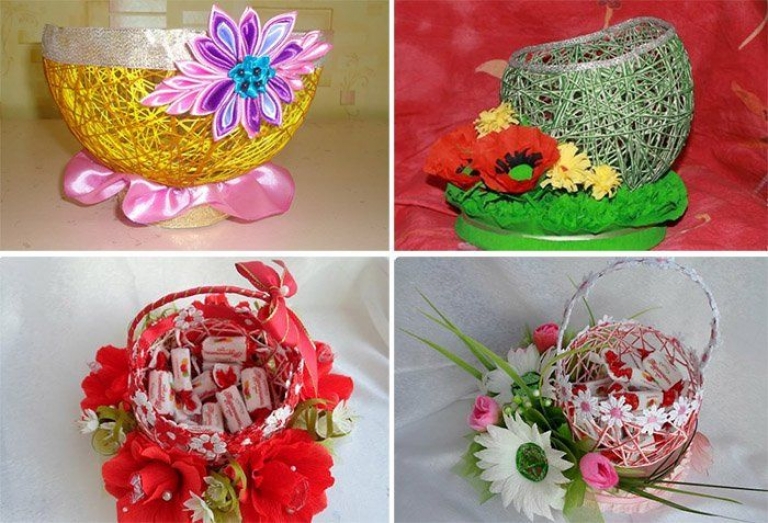
Candy bowls
Threads make excellent vases and candy bowls.
 Be sure to wrap the form in film or tape. We put the threads coated in PVA on the mold and let it harden.
Picture made of threads and nails
Recently, such paintings have become very popular.
The second option for a thread painting is gluing the threads with PVA glue. A very simple technique, and the result is beautiful!
20 ideas from the “Take and Do” channel
You will find many other cool ideas in the video. I especially like the thread feathers and earrings.
I look forward to your work! They will be the decoration of this page! Share your ideas and show off the models your kids have made!
And don’t forget that you have every right to provide a link to my website on your social media pages! More readers will help create a great collection of work!
Well, we still have more than one visit to the creative workshop ahead, so sign up! Receive notifications about the release of new articles on current topics. I'm looking forward to seeing you!
You will need:
Threads 2 colors
Scissors
* The length of the thread should be 3 times the length of the wire it covers. That’s why in the picture the brush is wrapped with thread three times.
Below you can find video instructions for weaving.

1. Prepare two threads of different colors and tie their ends to the wire.
2. To prevent the ends of the threads from moving, attach them to the table with tape.

3. Make a four out of one thread - wrap the main thread (the color of which will eventually be visible) around the rest once. It turns out that you passed once over the other threads and once under them. Now thread this thread through the hole of your quad (see image) and pull.

4. Repeat step 3. If you want the colors to change, repeat 10-15 times and then change the thread.


When you make knots, make sure that you create a “spiral ladder”.
This process is similar to weaving a friendship bracelet:
Wall decoration made of threads (master class)

You will need:
Wooden stick of any length (in this example 90 cm and 120 cm)
Inexpensive threads of different colors
Scissors
PVA glue.

* It will be more convenient to work if hang a wooden stick on two chairs or on a ladder.
1. Cut the threads into segments of different sizes. Threads of one color will have one size, and another - another. In this example, the longest threads are 60 cm long and the shortest 30 cm.

2. Squeeze PVA glue onto a wooden stick and begin hanging threads on it in the order in which you originally decided. Make sure the threads hang evenly.

3. Once all the threads are hung and the glue has dried, start cutting the threads diagonally with scissors. You can choose how to trim and what pattern will suit you.

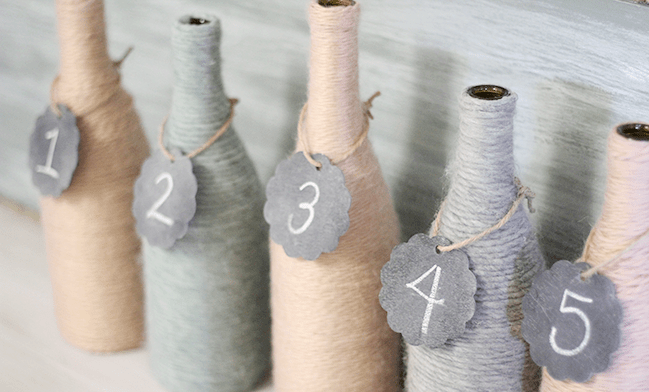
DIY thread crafts for children: decorating jars and bottles

What you can make from threads with your own hands: a beautiful pattern when painting a wall

DIY thread paintings

You will need:
Tablet with canvas
Thick thread
Spray paint.
* You need to use aerosol paint outdoors, wearing a mask and preferably wearing safety glasses and gloves.

1. Wrap the tablet with thread to create the desired design. Secure the thread to the back of the tablet with tape.
2. Start painting the canvas with one or more colors.
3. When the paint is dry, remove the thread.
How to make a picture from woven thread

You will need:
Wooden tablet
Nails and hammer or buttons.


Weaving from threads: decorations for the home or Christmas tree

You will need:
Multi-colored threads
Scissors
Pencil.
1. Cut out any geometric shape from cardboard. In this example, a circle and an octagon.

2. Make 2cm cuts around the perimeter. The distance between them is the same.
3. Insert the thread into one slit and begin wrapping it around the cardboard shape until you get the desired pattern.

4. Leave some of the thread for a loop so that the decoration can be hung.

How to weave a beautiful necklace from threads

You will need:
Grover washer or similar sized items
Scissors
Chain
Superglue (if necessary).

1. Cut a long thread, fold it in half, thread it through the ring and insert the ends into the loop, thereby securing the thread to the ring.

2. Hold the ring with one hand and start winding the thread around it with the other. Simply insert the double thread into the loop and wrap tightly until you have covered the entire ring.

3. To add more thread-embellished rings, you can repeat steps 1-2 and thread the chain onto the chain.
*You can also join all the threads using the same thread you used to wrap them. For this:
If you want to connect 2 rings, then do not cut the thread in the first ring, but use it to connect the two rings. To do this, thread the remaining tail from the thread of the first ring into the hole of the second and wrap the two ends 3 times, then tie a knot and cut off the excess.

If you want to add another ring, then you do not need to cut the thread from the first and second rings and wrap it around the adjacent ring.

You can continue to add as many rings as you like, wrapping them with multi-colored or plain threads.
* If the thread is not long enough, simply cut a new piece and wrap it around the threads, connecting them.
Cut another piece of thread and tie it to the outer rings.

How to make a beautiful 3-D letter from threads

You will need:
Letter or other desired shape made from plywood
PVA glue and bone
Pompoms or artificial flowers.

What can be made from threads: a bowl
In such a bowl you can keep various small things: keys, keychains, coins, etc.

You will need:
PVA glue
Brush
Scissors
Cling film or wide tape
Acrylic paint.
1. Cover the outside of the bowl with film or tape in 2-3 layers.
2. Cut about 50 cm of thread and twist it in a spiral as shown in the image. You should end up with a flat disk.

3. Turn the bowl over and place it on the table. Place your thread disk on top of the bowl (in the center) and use a brush and glue to secure the spiral so that it does not come apart.
4. Take the end of the new thread and glue it to the end of the glued spiral. Begin carefully wrapping the new thread around the bowl, adding PVA glue to hold the thread together.

* Do not wind the threads to the very edge of the bowl, leaving about 2-3 cm to it.
5. Secure the end of the thread and begin to generously lubricate the entire wound thread with glue. Leave the craft to dry.

6. Once the glue has dried, carefully remove the string bowl from the plastic bowl.
7. If desired, you can paint the bowl with acrylic paints.

How to weave a wall tree from threads

You will need:
Push pins or small nails
Long thread (preferably brown)
*This example uses a large piece of plywood to create a large tree, but you can make a small tree on a small piece of plywood to create a beautiful picture to decorate your home with.
1. Draw a tree on the plywood.
2. Start inserting buttons along the drawn lines of the tree.

* You should not do everything symmetrically and evenly - the tree has many irregularities.
3. Start wrapping thread around buttons or nails. Do it randomly, but start at the bottom of the trunk and work your way up.
*If you want to pause, just wrap the thread around the button a few times. When you return, simply unwind and continue to “weave” your tree.

DIY thread bracelets (video tutorial)
You will need:
Scissors
A compass or round object (a glass, for example)
Pencil
Buttons
For the 5th bracelet you will need: chain, clasp, pliers, needle nose pliers, thread, needle, scissors.
Annotations for the 1st bracelet:
* There are 8 cuts in the circle, located at the same distance from each other.
*Each cut is approximately 1cm deep.
* Mark the center of the circle and make a hole with a pencil.
*You must have 7 pieces of thread. There are 8 of them in the video, so one piece was cut off.
Annotations for the 2nd bracelet:
The length of each thread is 130 cm.
First, tie knots by passing one thread ABOVE the others, and after 7 knots UNDER the other threads.
Choose the number of threads and colors yourself.
You can change the color of the threads at any time.
Thread pompoms (video tutorial)
You will need:
Scissors.
DIY Christmas hats made of thread (video)
You will need:
Scissors
Ruler (to measure 25 cm or more, depending on the height of the hat)
Cardboard cylinders (from toilet paper).
Orange, red, purple - in capable hands threads turn into real masterpieces. You can make anything from threads: bookmarks, soft toys, bright flowers, jewelry and even lampshades. What can I say, see for yourself!
Organizer for pens and pencils
If pencils and pens are always scattered on your desktop, but you can never find the ones you need, the next thread craft is just for you. A cool one will not only bring them together, but will also become an original decoration for the room.
To make a pen organizer, you will need: cardboard tube from toilet paper, thick cardboard, thread, felt.
Cut out the bottom from cardboard and glue it to the pipe. Coat the pipe with glue and wrap it with colored threads. When the glue is completely dry, sew on a felt flower, beads, glitter, etc.

By the same principle froman ordinary bottle can be made into a vase from threads.

Bookmarks
Another interesting product made from threads is. Fluffy floss pompoms will turn even the smartest encyclopedia into a cheerful flickering traffic light.

You can read in detail about how to make a pompom from threads in the article, and I suggest you look at the diagram. I’m sure it will be very easy for you to figure it out, and now the page you need will never get lost.

Kolobok made of threads
Little dreamers and fairy tale lovers can make such a cute Kolobok from threads. All that is needed: yellow (white) threads or yarn, a balloon, PVA glue and colored paper.
Wrap the threads around the inflated balloon, first passing them through the glue. Before winding, carefully wring out the yarn so that no excess glue remains on it. When the threads are completely dry, touch the ball with a needle. The rubber will burst, and the threads will hold the shape of a ball or kolobok. From colored paper, cut out our hero's eyes, nose, lips and cheeks. Glue them onto a ball of thread. And also come up with some interesting hat for Kolobok.

Sun in hands or Dandelion made of threads
Hold a warm ray of sunshine in your palms. Mmmm... How nice it is! Do you also want to catch a playful sunbeam? Easily! Madeba fluffy dandelion made of threads, and a piece of the sun will always be with you.
The process for making a dandelion from threads is very simple and resembles the process of creating pom-poms from threads.

Thread applications
It turns out that threads can be used to create not only voluminous products, but also stunningly beautiful appliqués. Colored threads, a piece of linen, glue, small shells, cardboard, small cereals - and on your wall “a lonely sail appears white.”

How do you like this one? colorful cat Why so recklessly spilled milk on the floor?

Garland of threads
The New Year or a party at school will become even brighter if you decorate the festive hall with a garland of threads. The flickering cobwebs on the walls from floss lampshades will make the evening truly special and mysterious.
Making such lampshades is not at all difficult: inflate a small ball, wrap it with threads coated with glue, and let it dry. Pop the balloon and put small lampshades on the bulbs of a regular garland. Enjoy the colorful holiday!

Thread jewelry
Great news for little fashionistas! Threads that seem ordinary at first glance can become an original decoration. A luxurious necklace, funny earrings, a stylish bracelet - you can make jewelry from threads to suit every taste. A little imagination and patience - and now you are the queen of the ball.


Hedgehog made of threads
If you are delighted with soft toys, but buying a new fluffy every time is too expensive, I offer a reasonable alternative. A funny hedgehog made from socks and thread pompoms will cheer anyone up! And making the animal is very simple. Here look.