There are very few holidays for which you can decorate your home thematically. But luckily, Halloween is one of them. Today it is very popular all over the world, so there is a wide range of different jewelry on the market. But it is much more interesting to start the holiday even before it arrives, i.e. start preparing home decorations with your own hands.
Below are detailed MKs of 10 types of decor, which are quite enough to turn your home into a real castle of sinister power.
Bright lanterns
As you probably know, pumpkin is the main attribute of Halloween. In the article “How to make a festive pumpkin for Halloween,” we already told you how to make a Jack-o-lantern yourself. If you read this material, you must have noticed that this process is quite labor-intensive. That's why today we offer you an alternative - paper lanterns that resemble Jack-o'-lanterns.
You will need:
- orange and black paper;
- glue;
- scissors;
- stationery knife;
- a simple pencil;
- ruler;
- transparent glass;
- candle.
First, we will make the larger flashlight. Cut out a rectangle measuring 20x15 cm from orange paper. Now, using a knife, make strips along the length of the flashlight (=15 cm), leaving 1.5 cm at the top and bottom. The width of the strip is 1 cm. Cut strips 3 mm wide from black paper. Now decorate the top and bottom of the lantern with three black stripes using the weaving method. Making the decoration for the middle will be a little more difficult. Take black strips that are two to three times longer than the length of the flashlight. As you weave, push the orange stripes apart at the same time. This way you can make the flashlight convex as in the photo.
Now it's time to work on the small lamps. First you need to measure the diameter and height of the cup. Cut out a rectangle from orange paper: the width should be equal to the height, and the length should be equal to the diameter of the cup. On the reverse side, draw funny faces with a simple pencil and cut them out using a stationery knife. Glue the cylinder together.
Now you can insert transparent glasses with candles into the blanks and enjoy your work. These lanterns will fill your home with a good mood.
Fairy lights

Garlands are one of the most popular Halloween decorations: firstly, because they are easy to make, and secondly, they look very impressive.
You will need:
- paper in black, orange, white, gray, coffee colors;
- a thread;
- needle;
- scissors or stationery knife;
- glue;
- templates
If you know how and love to draw, then creating such a decoration for your home will be a mere trifle for you. If you are unlucky and don’t have this skill, it doesn’t matter - templates that can be found on the Internet will come to the rescue. They should depict various Halloween symbols: pumpkins, bats, witches, black cats, ghosts, ravens. You can also make a garland from ordinary isosceles triangles in holiday colors. When the templates are prepared, it’s time to start making the decor.
Fold the paper of the required color like an accordion and use a regular pencil to transfer the image onto it. Now cut out the shapes along the contour. If necessary, draw eyes or mouths for the characters using pens or markers.
*Helpful advice: If you are cutting out complex figures, for example, a Jack-o-lantern, then cut out the pumpkins themselves from the accordion, and use a stationery knife to make the faces separately on each copy.
After this, thread the needle and string the cut out figures onto it. Distribute the cutouts evenly on the string.
If you are making a garland consisting of triangles, then you need to cut out double figures, i.e. the two triangles must be connected to each other. Take one pair and put a thread between them, then glue the triangles together.
This cute decoration can be made in just a few minutes.
“Mouse” staircase decor and more

If you have a staircase in your house, then you can decorate it in a very original and unusual way.
You will need:
- black paper;
- scissors;
- pencil;
- Double-sided tape.
One of the most popular types of staircase decor is mice. To make such a decoration, you need to find on the Internet or draw yourself templates of mice in different poses. You can also make minks. Fold the paper like an accordion and trace the template with a pencil. After this, cut out the figures. Using double-sided tape, glue the mice on the steps; you can decorate the baseboards in the same way.
Another option for a similar decor is the shadow of a woman or man. Cut out a shape on black paper and divide it into pieces, the length of which is equal to the height of the steps. Just as in the previous case, glue the image using double-sided tape.
You can further decorate the staircase black curtains, tying them to the railing. This will make the decor look even darker.

What's Halloween without bats? These small creatures are one of the main symbols of the holiday. And today we will decorate our home with these small animals made from pumpkins.
You will need:
- small real or artificial pumpkin;
- matte black acrylic paint;
- a fluffy brush or sponge for paint;
- glue;
- black and white cardboard;
- scissors;
- hole punch (optional).
Wash and dry the pumpkin well. After this, apply paint with a brush or sponge. Try to paint so that the natural color of the vegetable does not show through. If you didn’t get it right the first time, wait until the paint dries well and then apply another layer. While the pumpkin is drying, make the remaining elements. Find on the Internet or make your own a template for the wings. Their length should be about 15 cm. Cut out two identical wings from black cardboard, leaving 0.5-1 cm on the fold for fastening. Cut out ears from the same cardboard, and eyes from white cardboard. There is no need to cut out the pupils separately - just pierce them with a hole punch or cut holes with sharp thin scissors - these will be the pupils. Now all that remains is to put all the parts together. To do this, use good glue.
These pumpkin bats make great Halloween decorations. For example, you can plant it in a flower pot or draw a moon and plant it against the background of this poster of our mice.
Mummies

Making a mummy is very simple, so even children can be involved in the process.
You will need:
- aluminum wire;
- white bandage or cloth.
Cut the fabric or bandage into strips 1-1.5 cm wide. Make the frame of our future mummy from wire. Now start wrapping it tightly around the “skeleton”. Try not to leave empty spaces - the wire should not be visible. When the strip is finished, tie it tightly to the wire to secure the end. Secure the bandage in the same way at the beginning. Do this in several layers and tie the end tightly.
Once made, mummies can be placed in various poses or entire compositions can be created.
Spider

Black spiders are an essential attribute of Halloween. Therefore, today we will make such beauty.
You will need:
- foam ball;
- black acrylic paint;
- brush or sponge for paint;
- glue;
- black decorative wire;
- eyes for toys;
- half a toothpick (optional);
- thread (optional);
- scissors.
Apply paint to the ball and let it dry thoroughly. Now cut eight pieces of wire of the same size and bend them into the shape of spider legs. Pierce the ball with wire and put the legs in place. Glue on the spider's eyes.
This toy can also be made in the form of a pendant. To do this, fold the thread in half and tie it tightly at the blunt end of the toothpick. With the other side, pierce the ball from above.
*Helpful tip: For more believability, choose light-colored threads.
Aerial web

A spider web will decorate any home for Halloween. It’s not difficult to make such a beautiful and unusual decor. But there are certain tricks that we will tell you about today.
You will need:
- woolen threads, most similar to a cobweb;
- skillful hands.
The whole secret is to stretch the thread as believably as possible. One layer should go along, and the second should, as it were, cross the previous one. But try to give the web a natural look.
This creative accessory can be used to decorate chandeliers, tables, lamps, etc. If you do everything right, your guests will not be able to distinguish an artificial web from a real one.
Ghost

A large, spectacular ghost will decorate any interior and create an unforgettable holiday atmosphere.
You will need:
- large gauze;
- balloon;
- PVA glue or starch;
- wire;
- circles of paper, fabric or marker.
Inflate the balloon to the size you want the head of the future ghost to be. Place the ball on the bottle. Also attach the ghost’s “hands” to the latter using wire.
Also place a dry towel on the bottle, which will absorb excess liquid. Make a solution of water and starch or glue. After this, soak the gauze in it. Now hang the workpiece on the previously prepared frame. The ghost should dry well, after which you need to pull out the ball and bottle with wire. Glue, sew or simply draw eyes with a marker. That's all, our decoration is ready. Thanks to this decor you can make very beautiful compositions.
Intimidating wreath

A spooky wreath makes a great Halloween door decoration. This decor is very easy to make with your own hands.
You will need:
- thin branches of willow or other tree (they should be flexible enough);
- spray black paint;
- Halloween accessories (spiders, cobwebs, yellow leaves, cut-outs, etc.);
- scissors;
- glue;
- Double-sided tape.
Take one fairly dense branch and roll it into a ring, wrap the remaining branches around it, forming a circle. When you have made the base of the required size, excess branches must be trimmed. Spray the paint evenly over the branches and leave for 2-3 hours until completely dry.
Now all that remains is to decorate the wreath with accessories using glue or double-sided tape. We leave the finished decoration for a couple of hours so that all the elements stick well (if glue is used). All is ready! Hang it on the door and admire the result. Believe me, such a wreath will scare away even the most evil forces.
Witch's Potion

What could be more thematic and interesting than decorating your “shelter” with real bottles of a wonderful potion. Anyone can make such a decoration, and we will prove it to you today.
You will need:
- glass containers of various types;
- spray matte black paint;
- wine corks;
- kraft bag or kraft paper;
- glue pencil;
- black or brown pen or felt-tip pen;
- a spoonful of ground or instant coffee or a bag of black tea;
- scissors.
Various bottles are suitable as glass containers: wine, oil, vinegar, syrups, etc. Remove the labels and wash them in water and detergent. Dry well and treat with medical alcohol so that the bottle is clean and grease-free. Apply paint over the entire surface and leave for a couple of hours until completely dry.
While the bottles are drying, let's prepare the labels. Make a strong brew of tea or coffee. Cut a large rectangular sheet of paper or bag and make a not too dense ball out of it. Now dip the ball into the solution and leave for 1-2 minutes. After this, take out the paper and straighten the sheet. Leave it for a while to dry. Write the names of the potions, for example, “Vampire Blood”, “Witch Spit”, “Eyeballs”, “Grave Dust”, “Virgin Tears”, etc. Very carefully tear off each label, trying to make it look as natural as possible. Using a glue stick, glue the names onto the bottles and seal them with corks.
Now you can make a whole composition using the prepared vials with the “potion” and the artificial web that we talked about above.
We wish you an interesting preparation and a happy Halloween :)
A universal selection of gift ideas for any occasion and occasion. Surprise your friends and loved ones! ;)
Greetings to all those present! Halloween is close, and therefore I announce the topic of today’s article is Halloween decorations.
I like this holiday so much. Not creepy zombie vampire costumes or the like. (although they can be made interesting, believe me, I told you in this article), but the atmosphere itself is something mysterious and mystical.
Just recently I wrote an article about makeup for Halloween. And shared it on one of the social networks. networks And then I realized that the terrible medieval opinions about this holiday are not only alive, but thriving in all their unhealthy splendor.
In short, what I’m saying is that I really hope that you, dear reader, are not one of these obscurantist individuals.
After all, Halloween is just a reason to remember that we are not eternal. And he does not at all call evil spirits into the house, for that matter
DIY Halloween Decorations: 13 Ideas
Mostly the ideas will be for the home, so that you can create the appropriate atmosphere. Many of them are so simple that in a day you may well have a fairly large number of attributes of the theme of this holiday.
Halloween Home Decorations
With the help of various kinds of mercies and horrors we will achieve wonderful effects.
Mouse Pack
The simplest and most affordable way to decorate a room is to cut out unusual compositions.
In order to make it, you will need bat templates. Cut them out of thick paper or felt and attach them to the wall.
You can do it differently: glue the mice to long thick threads. Then it will turn out to be a kind of “rain”.

Web
Again, a fairly simple idea that will allow you to add a fun accessory to your home interior.
For the web, take a few sticks, shiny woolen threads, a needle and a glue gun (you can use regular glue).
Glue the sticks together in the center and wrap it with threads for strength. The final stage is to wrap the resulting frame with thread to create a spider web pattern. Threads can also be fixed with glue.

Ghost
A little ghost will not only be a great decoration for your apartment on Halloween, but will also be a pleasant surprise for kids and adults.
For it, prepare: glasses wipe or paper napkin, lollipop and ribbon. Wrap the lollipop in a napkin and tie the center with a ribbon. Draw a muzzle.
To hang this miracle indoors, simply sew a ribbon loop to the head.

Scary balls
All that is needed for such an accessory are balloons inflated with helium, beautiful ropes for tying them up and scary sticker silhouettes.
You can make such a composition in different ways: either inflate balloons, attach strings and stick stickers, or prepare design templates in advance and apply a pattern using a can of spray paint, applying paper with a pattern to the ball. The first option seems less expensive to me.

Special roses
Roses here are made very simply - a circle is cut out of felt and a spiral is cut out inside. Then the structure is rolled up (at the same time glued) and attached to the desired location.
In this case, this place is a Halloween wreath, rolled up from thin branches.
By the way, you can buy an excellent set of felt Here. More than 40 colors, dense - just what you need.

You can also do something similar for the New Year - that’s great too

Fruit madness
Nobody canceled the decorations on the table either. And I think there’s no need to even tell you how to do this.
Take bananas, peeled tangerines, chocolate and neutral greens with a dense stem (say, lettuce). Stick green twigs into the tangerines.
Peel the bananas and cut into two parts. Melt the chocolate in the microwave and pour over a flat surface (such as a large plate). Wait until it dries. Using a round lid, cut out eyes and a mouth and attach to the banana.
Terribly scary and terribly healthy treats are ready

I hasten to wrap things up, because I told you 13 ideas for decorations for October 31st. Share your impressions and ideas in the comments. See you soon!
P.S. Subscribe and repost.
Sincerely, Anastasia Skoracheva
Category: Halloween crafts: 30 master classes with photos on how to make them
Halloween is one of the most exciting and fun holidays. Yes, exactly cheerful ones, because in our times this day does not mean sacrifice. Dressed up children go to neighbors' houses and persistently demand worthy treats and gifts, while jokingly threatening to take revenge for their stinginess. This section presents 30 step-by-step master classes with unique photographs - they can be made to decorate your home, as a gift to friends, or taken to an exhibition in kindergarten and school.
How to Make Halloween Crafts
The symbol of the holiday on this day is a pumpkin. Ominous slits are made in it for the eyes and mouth, and a lantern or candle is placed in the empty middle. On a holiday, a pumpkin is placed near the front door. For guests and passers-by, this means that the house is already occupied by evil spirits. The second name of this terrible celebration is the Festival of the Dead. The Celts also believed that on this night they could mentally connect with their buried relatives. This is where the name came from. How to decorate your home for Halloween? There is room for imagination to run wild. One condition - all decorations must be terribly cheerful. If you have guests this day, they should be scared and pleasantly surprised. So, let's begin.How to Decorate Your Home with Halloween Crafts
Not a single creepy house on such a holiday can do without mummies. Collect all glass vases, glasses, jars and other transparent containers. Prepare a candle of the same size for each jar. It should be located there freely. To support the candle, add sand, beads, coffee beans, or something similar to the bottom of the container.
If you have skeleton figures, hang them on glasses. The figures can simply be cut out of white or black paper and glued to the glass. To make the vases more beautiful, you can decorate the bottom with bows made of gauze or bandage. It is better not to decorate the top, because the bandages can catch fire if they come into contact with a candle. The figures can be replaced with painting - draw a skull or a ghost on the glass with a marker.
What is a holiday of the dead without ghosts and ghosts? Yours should be terribly creepy and located in the most unexpected places. And the floating ghosts will scare even the most fearless guests! Stock up on plenty of gauze or white cloth. The older and more worn the fabric, the better.
Cut the old fabric into uneven pieces and wrap the balloons. You can tighten the neckline, and on the material itself you can draw creepy eyes and an equally creepy mouth.
Additionally, you can make little ghosts from new pieces of gauze. The bigger, the better. Dilute PVA and water in a basin. Rinse napkins, gauze or cloth in the solution. Gauze will look better. Inflate small balloons and put wet gauze on them.
Wait until dry and pop the balls out. Using a black marker, draw eyes and a mouth on each ghost (while drying). Hang the finished monsters on chandeliers, cabinets and behind doors.

The holiday wouldn't be so scary without pumpkins. Round pumpkins are great for lanterns. Cut holes in them in the shape of a face, a cat, or various monsters. If you can’t cut out the figures beautifully, it doesn’t matter. Cut out the eyes and mouth in the form of triangles.
When a candle or lantern is burning inside, it will become scary in any case. Small round pumpkins and large oblong ones will also come in handy. You can place them on burlap sacks near chairs and benches for guests.
Don't forget the candy. Wrap treats for little monster guests in creepy paper. You can buy a special one, or you can make it yourself. The quickest option is to wrap each candy in black paper and tie with orange ribbons. Vases with sweets should also be decorated. Glue spiders to them, paint them in the most creepy images.
Guests should be scared from the very threshold. Hang a wreath on your door just like at Christmas. Only it should be black and covered with cobwebs. The second version of the wreath is black gauze with skeleton hands sticking out of it.
Create a festive atmosphere with your own hands. Halloween is a reason to have a blast!
Halloween is not an official holiday in our country. However, the catchy outfits and stunning surroundings of this day cannot leave Russians indifferent. On the night of November 1, more and more people take to the streets dressed as monsters or ghosts, and the windows of houses and apartments are decorated with jack-o'-lanterns.
Stores offer a wide range of holiday paraphernalia, but it will be much more interesting (and cheaper) to make Halloween crafts with your own hands. Moreover, many of them do not require special materials or skills.
Decorating the room
For afterlife themed parties, you can create some themed items. DIY Halloween crafts can be created in just a few hours, and then can be used annually until you want to come up with something new.
Garland
A simple decoration in the form of a garland will immediately transform the room. It is enough to stretch a rope or ribbon from wall to wall and decorate it with homemade ghosts, and the atmosphere will immediately become ominous and mystical. To create a restless spirit, you will need a square of any white fabric. As a base for the head, crumple a sheet of paper, giving the lump a spherical shape. Place it in the center of a square of fabric, wrap it in it and tie it with a thread at the “neck”. That's all. All that remains is to draw a pair of eyes or an ominous face. There is an even simpler option - you can cut ghosts from a strip of paper after folding it like an accordion. Other Halloween symbols can also serve as the basis for the garland: pumpkins, bats or spiders.

Ghost
Making separately hanging ghosts is also easy: you only need a small ball, a piece of gauze and PVA. The fabric is soaked in glue and wrung out. After which it is used to cover a ball lying on the neck of a jar or bottle. The structure must be stable. Pretty soon the gauze will dry to the shape you gave it. The jar or bottle is removed, and the finished ghost can be hung on a thin thread (fishing line) in the corner of the room. If there are several such figures, they look even more interesting.

Volumetric paper crafts for Halloween
You can make not only two-dimensional, but also three-dimensional crafts from paper. In particular, the pumpkin - the main symbol of Halloween - has several versions. The easiest way to make it is to glue it from paper. It's quick and even kids can do it.

Therefore, you can create these with children who already know how to use scissors or at least glue ready-made strips.
The pumpkin can be round or flat; for both options you will need orange and green colored paper.

The thickness of the strips, their length, shape and type of leaves - all this is at the discretion of the one who decided to create such crafts for Halloween. You can not only decorate the room with your own hands, but also create souvenirs for party guests - small pumpkin pendants.
Vampire bats
A must-know for those who make Halloween crafts themselves: it will always come in handy when it comes to everything mysterious and sinister. A flock of these bats immediately creates the atmosphere of an abandoned attic of an old house.

The easiest way to make a bat is from black paper or some similar material: cardboard, artificial leather, foamiran. It’s better to place vampires in a room in a group - it’s more believable.
Candles and candlesticks
Halloween-themed crafts can be not only purely decorative, but also functional. Thus, candles, decorated taking into account the peculiarities of the holiday, will become the main source of lighting on the most terrible night of the year. They can be painted with acrylic paints to depict a pumpkin, ghost or monster. And a candlestick can be easily made from a simple glass glass, painted in the same way.
pumpkin head
What would Halloween be without a pumpkin head grinning its unique smile? Anyone can make it from a real vegetable. To do this you will need a pumpkin, a knife and a little dexterity. The middle of the fruit is removed so that the remaining layer is 1.5-2 centimeters. Then the holes for the eyes, nose and mouth are carefully cut. Depending on your mood, your facial expression can be absolutely anything.

All that remains is to insert a light source inside your head, preferably a battery-powered flashlight.
Witch hat
While preparing crafts for Halloween, you can also create costume elements with your own hands. For example, a cap for a witch party or an evil sorceress costume. It consists of a flat ring (a circle with a hole in the middle, suitable for the size of the head) and a cone. Both can be easily cut out of thick cardboard, painted black and glued together. You can also create a witch's vehicle - a broom - from dry branches and a mop stick.
And something else…
What other paper crafts can you come up with for Halloween? Yes, any! Every item you come across can be turned into something Halloween-themed. Computer disks are modified into ghosts, shampoo bottles into vampires, and a trash can into Baba Yaga's mortar. All sorts of monsters are sewn, knitted, and sculpted from plasticine. By doing this seemingly useless task, you can find many new talents in yourself.
And creating crafts for Halloween with children is generally a real pleasure. They so joyfully create nightmare characters that in the process they themselves cease to be afraid of them.
I won’t be mistaken if I say that soon the whole world will be making crafts. This is one of those holidays when almost every home wants to make a monster for themselves, or an attribute that goes back to the Celtic customs of this holiday. To be honest, I am not a supporter of horror films, especially when it comes to our kids. Agree, you shouldn’t present horror, blood, maniacs and everything like that as something normal or even attractive. And even more so in the form of fun. Therefore, you and I will make more or less nice products.
Surprise gift

For work we need:
- Box;
- Cardboard;
- Buttons;
- Colored paper;
- Glue;
- Scissors;
- Pencils.
Making crafts:

All! You can donate!
Candlesticks

Essentially, this is a jar that is painted and decorated with an applique based on the holiday theme, and a candle is attached to hot paraffin inside.
Decorations are cut out of paper. It could be: spider , cat, bat, owl, cobweb, etc.

If you light a candle in the evening, shadows of these figures appear on the walls. It's simple to do, but the end result is very interesting.
Scary pumpkin
View this post on Instagram
How can you transform a simple applique?
- Cut out a stencil of a pot-bellied pumpkin in cardboard (without the tail, glue the tail separately onto the cardboard).
- Glue thin orange paper to the back of the cardboard. You can draw stripes characteristic of a pumpkin on the front side.
- Glue triangular eyes and a toothless smile onto the back of the paper.
At first glance, this is an ordinary picture. The eyes and smile will be noticeable if shown against the light.
Autumn candlestick
Cover the jar with colored leaves (napkins or paper) in autumn colors. You can make the background monochromatic: yellow, green, red. But you can also combine several colors. Just don’t make it too colorful.
Cut out figures of Halloween characters: a scared cat, a bat, a rat, a ghost or owl . Glue them. The templates can be printed or traced from the screen - the pictures can be enlarged by clicking:
The bats
Bat
It is very easy to make the figure even and symmetrical if you cut out a half by folding a sheet of paper in half.
All that remains is to hang such decorations on the tree.
Bat
To create it you will need:
- Toilet paper sleeve;
- Black paint;
- Black paper;
- Scissors;
- Glue.
Instructions:
- Paint the sleeve black.
- When the sleeve dries, flatten it. Then straighten and press the edges from above and below, connecting the ends.
- Cut wings for the mouse.
- Glue the wings.
- Draw eyes or glue ready-made ones.
Now you can hang the mouse and let it “fly” under the ceiling!
Ghosts and witches
Witch applique
And again we use unusual ideas .
We will need:
- Cardboard;
- 7 ice cream sticks;
- Glue;
- Black, white, brown and yellow paper;
- Black marker;
- Green paint.
We design:
- Glue the sticks onto the cardboard base.
- We paint them green.
- Cut out a pointed hat.
- Making the witch's hair.
- We paint the face: eyes, smile. Glue on the eyes.
- The final touch is a broom!
A child can easily handle this craft.
Ghost
Simple and fast:
And now you can hang it up.
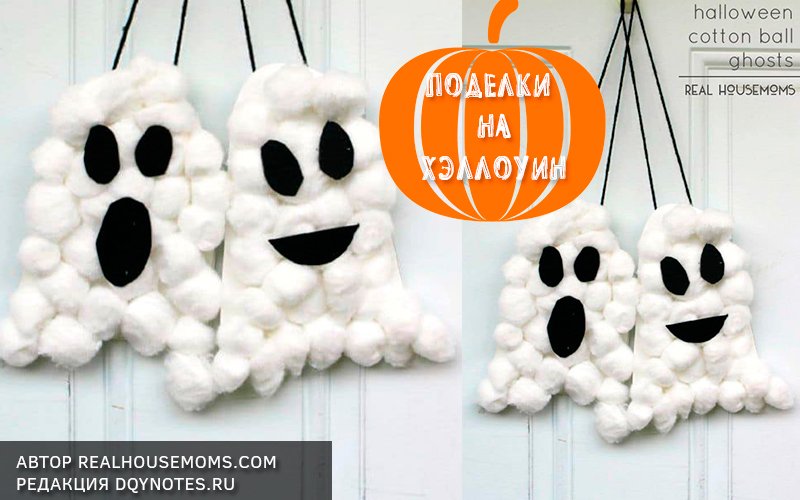
Naughty ghosts
To make it you will need:
- Black felt;
- White cardboard;
- Strings;
- Cotton balls;
- Glue and scissors.
Manufacturing:
- Cut out 2 figures of floating ghosts from cardboard.
- Glue cotton balls onto this base, completely covering it.
- From felt or paper cut out the face of a ghost. And we fix the eyes and mouth on cotton balls.
- We fix the rope on the back of the craft.
Cheerful witch, I would even say friendly in appearance
Let's make things as easy as possible!
Our product will be composed of several geometric shapes:
- Large triangle (black);
- Rectangles:
- 3 black (2 of them are the same size);
- Green thin small;
- 2 orange;
- Brown is thin and long;
- 3 white circles (one large, 2 small).
If you cut all that out, let's make a cheerful witch:
If you want, you can change something. For example, it would be interesting if the broom was not in the hands of a sorceress, but Magic wand , etc.
Movable toy
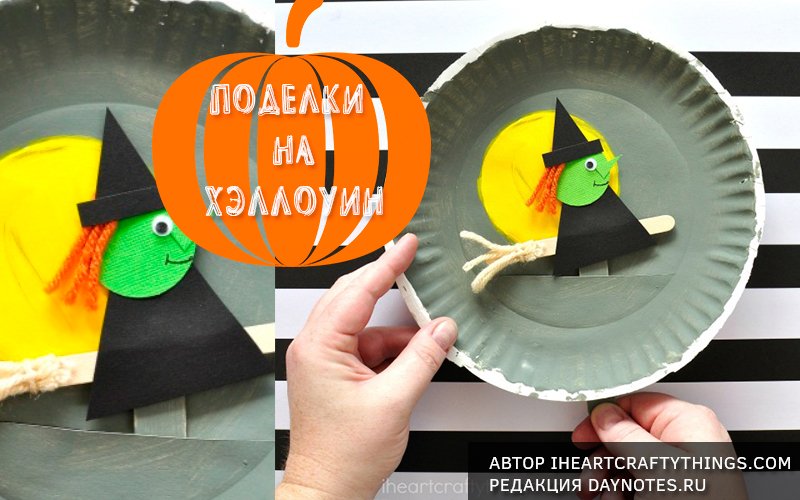
Do you want the toy to move? Then let's begin!
The main idea is that the witch should actually “fly” against the background of the moon.
- Paint the plastic plate dark gray. Leave only a large circle. Paint it yellow (or leave it white).
- We assemble a figure from a triangle (body), a circle (head), a small triangle (nose) and a rectangle (hat flap). Let's finish drawing the eye. Glue the hair from red yarn.
- Making a broom. We tie pieces of yarn to an ice cream stick.
- “Put” the figurine on a broom.
- We paint another stick dark gray. And glue it vertically to the figure from below.
- We make a horizontal slit in the plate (below the sun). We thread the stick through the slot.
If you move this wand, the witch will fly!
FELT Pumpkin with treats
We will need:
- Black, green and orange felt (felt);
- Threads;
- Scissors;
- Needle.
Making:
- Cut out an oval and half an oval from orange felt. Download printable template.
- From black - 2 circles, a triangle and a smile.
- We need a small trapezoid made of green felt.
- We sew the oval and half of the oval (it turns out like a pocket). And at the top there is a green “tail”.
- Glue the eyes, mouth and nose to the oval.
Why did we make a pocket? To from pumpkin the guys could get the candy treasures we had hidden!
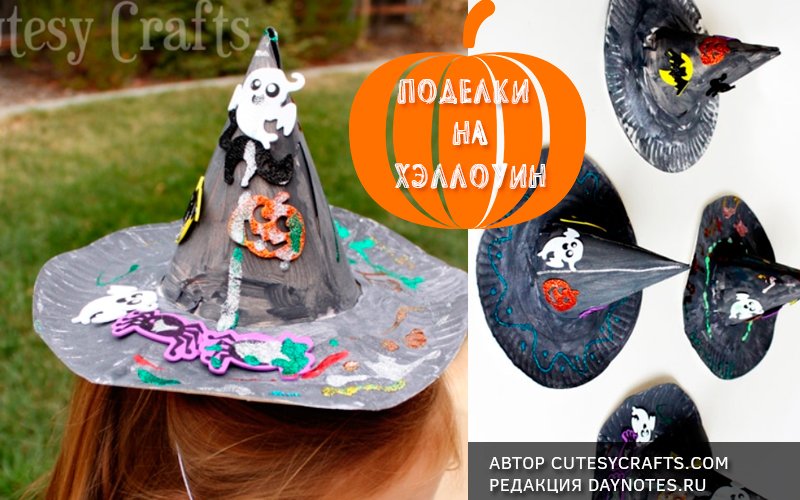
Magic hat and decorations for the witcher
We will need:
- Plastic plate;
- Cardboard;
- Glue;
- Paints;
- Tassels.
Making:
- Turn the plate upside down. We make cuts in the middle of the plate so that it is convenient to bend the central part up.
- Roll the cardboard into a cone. We fix it (you can also use a stapler).
- Glue the cone to the folded edges of the plate.
- We paint the craft black.
- Now you can decorate this hat as you wish.
The second option is to make cuts on the cone itself, and in a plate simply cut a circle along the diameter of the cone, as in the photo below
Jewelry - earrings and pendant made of hot glue
Beautiful decorations for a little witcher are easy to make from hot glue. You will need a black glue stick and a hot gun. If there is no black rod, the products can be painted with nail polish or acrylic paint. You will also need spare parts for earrings and a pendant; you can use old jewelry or buy new ones in a special store.
How to do:
- Working with glue is very simple, just like drawing a spider web with a regular felt-tip pen. To prevent the glue from sticking, draw on parchment or a flexible plastic board.
- If there is a temperature control, then select medium so that the glue is not too liquid.
- If you want to make the body of the spider more convex, then wait until the first layer dries, then apply an additional layer of glue to the body
And a pendant in the shape of a spider.
Tell us about your crafts and how you made them. And share photos. If you have any new ideas, tell me. And don’t forget to check the site (or better yet, subscribe to new articles) so you don’t miss anything useful.
AND THAT IS NOT ALL! FOLLOW THE LINK TO THE NEW COLLECTION. HERE YOU WILL FIND PRINTABLE TEMPLATES AND MASTER CLASSES!